FREE SHIPPING ON ORDERS OVER $99 (Contiguous US Only) $5 Flat Rate Shipping Every Time*

Tutorial

  1. Shop This Look: Glitzy Knobs Jewelry Holder

    Shop This Look: Glitzy Knobs Jewelry Holder

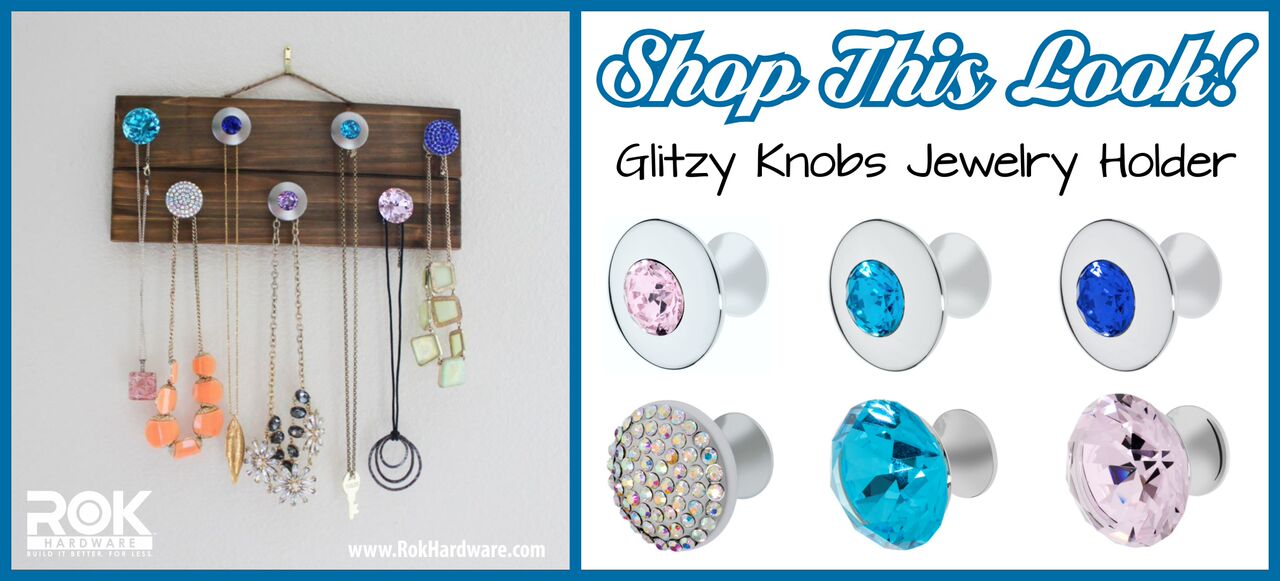
    How beautiful is this glamorous necklace organizer?! Amazingly enough, it’s also extremely easy to make all on your own! Even if you aren’t a regular DIYer, this is a great project for a beginner. Shop the links below to get this same look! But just so you know, these beautiful crystal knobs come in lots of other colors, finishes, shapes, and styles! So click here to check out all your options. Maybe you love the design of this jewelry holder, but blue and pink just aren’t your colors. Or maybe you prefer polished gold instead of polished chrome. Or maybe you like a more squared shape instead of circular... or both together! Whatever it is, we’ve got it! So pick what matches your preferences best and then see the how-to video at the bottom of this article for a quick guide on how to make this fun necklace and bracelet holder. Some other ideas: use it in your entryway to hold

    Read more »
  2. How to Install a Ceiling Medallion

    How to Install a Ceiling Medallion

    Ceiling medallions aren’t really used much anymore. But why not?! They can be absolutely beautiful and unique. I don’t know why these oft-stunning pieces of room decor are not being used like they used to. Maybe because people don’t know how to install them. Well, if that is the reason, then no more excuses! Here’s how to install a ceiling medallion.

    What you need to know:

    Not all, but most ceiling medallions today are made of a material called polyurethane. If yours is real plaster, then it’ll be heavy and this installation method probably won’t work. Polyurethane is a wonderful alternative to plaster because it’s lighter and more affordable, yet it

    Read more »
  3. Problems Hanging Wall Pictures? WallGenie 123 is Your Solution

    Problems Hanging Wall Pictures? WallGenie 123 is Your Solution

    Considered one of the easiest DIY projects to tackle on your own, hanging wall pictures and paintings has been a time-honored tradition for centuries.  I can feel your cringe already when I said "easy". In fact, hanging wall pictures is also responsible for countless arguments, achy arm muscles, and the head-pounding overuse of the phrases, "juuuust a little bit more to the left," and "It's not level, we need to fix it." Do these sound familiar to you? Well, if you've ever tried to hang anything, I'm sure they do.

    When you're looking at hanging art on the wall there are three factors to consider:

    1. Weight and weight distribution of the art: Whatever tools you use to hang your wall art need to be strong enough to hold the art. For most framed art 10lbs. is plenty strong enough, for heavier artwork you will need hardware that can hold 25+ lbs.
    2. Placement: Placement or arrangement is important to give your house aesthetically pleasing decor.
    3. Straightness:
    Read more »
  4. Weekend Project: DIY Adirondack Chair

    Weekend Project: DIY Adirondack Chair

    I remember my childhood summers spent in the Wisconsin heat - Cardinals ball cap, sweet tea, and a Cards - Cubbies game on the radio. I used to love perfectly lazy summer days and listening to Lee Smith close out the 9th. Those days would have never been complete without slouching back in my Adirondack chair, and my feet propped up on the deck railing.

    Adirondack chairs are such a critical part of our leisure that they stand for pause anytime people walk by them, noting comments like, “Man, I wish I had one of those,” and “That chair would look great on my front porch.” But, have you ever asked yourself, “How easy is it to build an Adirondack chair?” Well, you might be surprised to know it may be one of the easiest and fun projects you work on all summer. Building a chair takes a weekend, and it’s likely you already have the tools at home, or in your workshop.

    Read more »
  5. Rok Community Post: Installing Soft-Close Drawer Slides

    Rok Community Post: Installing Soft-Close Drawer Slides

    Whenever my husband and I tour a model home, I find myself testing out the kitchen drawers to check out their closing capabilities. It’s an odd thing to look for in a model kitchen, I know. But for me, it’s the little details that really make the difference.

    Back in the reality of our not so model home, we are on a mission. Our goal over the next few years is to update and upgrade our 15-year-old house. We’re tackling projects that encompass both design and function. And, we’re starting by upgrading the kitchen drawers with soft close ball bearing drawer slides.


    Read more »
  6. Weekend DIY Project: The picnic table sandbox!

    Weekend DIY Project: The picnic table sandbox!

    We are always on the lookout for a great weekend project. This week, I found a pretty awesome project to build for the kids. It is a picnic table/sandbox. Seriously, what kid doesn’t love playing in the sand?

    We love this table for a couple reasons. Anytime you can build something that serves two, or more, purposes and saves yard space that is a big plus in our eyes. Secondly, this table is fully customizable. You can put your own personal touches into it. You can use flat boards, or mini-planks. You can build a canopy, attach storage boxes to the sides, and paint it however you’d like.

    This is a great project for DIYers who don’t like to be constricted to someone else’s plans. It’s easy enough to watch a tutorial and design your own, and I did find a couple Youtube videos to help you along. The first is from Dave's Woodworks, who provides several DIY projects on his Youtube page. The second video is a nice father daughter video from DMIdea.

    Read more »
  7. How to Measure Your Cabinet Door Overlay

    How to Measure Your Cabinet Door Overlay

    Often times, cabinet doors are designed to lay on top of the cabinet opening. When the cabinet is closed, its door – which is slightly wider than the opening it covers – comes to rest against the exterior face of the cabinet itself and conceals an area of the cabinet frame or panel. This type of design is known as an “overlay” because it literally lays over the front of the cabinets.

    Simply put, cabinet overlay is the space that your cabinet door covers the frame or panel of your cabinet, on the hinge side of the door.

    Measuring the Overlay

    Measuring the door’s overlay is one of the critical steps you’ll need to take when preparing to install a cabinet door or replace existing hinges. If the overlay is not measured properly, then the door won’t lay correctly over the cabinet. When measured incorrectly, the cabinet door will either extend too far (and touch the door that it is next to), or it will not extend far enough

    Read more »
  8. What's that Wednesday: The Door Stop Pin

    What's that Wednesday: The Door Stop Pin

    Door Stop Pins: What are they?

    A door stop pin is a clever little piece of hardware that is easy to install. Once installed, the pin restricts the opening of a door to approximately 100 degrees.

    When to Use a Door Stop Pin

    Opening a door too wide causes the door to bump into the adjacent wall. Doors colliding with walls can cause scuffing, puncturing, breakage, or other kinds of damage. You need for the door to open and close normally, but you also need to put on the brakes and stop it right before the collision happens. A door stop pin is the perfect solution, and they come in different finishes and styles to blend right in with your decor.

    Read more »